今回は物体検出で取得したBoundingBoxをROSでpublishする方法について記載していきます。
物体検出した場合、その結果のBoundingBoxなどをどのように連携して利用するかというところが課題になってくると思います。今回はROSのpublishでデータを送信し、それを受信してモーターを動作させるようなプログラムを作成しましたので、それの一部を抜粋して紹介します。
publishまでできればモーター側としてはデータを利用するだけとなります。よって、物体検出をするプログラムのほうでBoundingBoxのデータを作成してpublishしていきたいと思います。
前提
・ROSの環境が構築されている
・物体検出のプログラムが用意されていること
メッセージファイルの作成
まず、今回送信するメッセージファイル(BoundingBox.msg)をフォルダを作成して格納しておきます。
|
1 2 3 4 5 6 7 |
float64 probability int64 xmin int64 ymin int64 xmax int64 ymax int16 id string Class |
物体検出で検出したものは複数である可能性が高いため、上記をさらに配列にして送信できるファイル(BoundingBoxes.msg)も用意しておきます。今回ヘッダーは含めていません。
|
1 |
BoundingBox[] bounding_boxes |
メッセージファイルを利用できるようにビルドする
上記で用意したメッセージファイルはそのままでは利用することができません。なので以下のファイルを編集して利用可能な状態にしていきます。
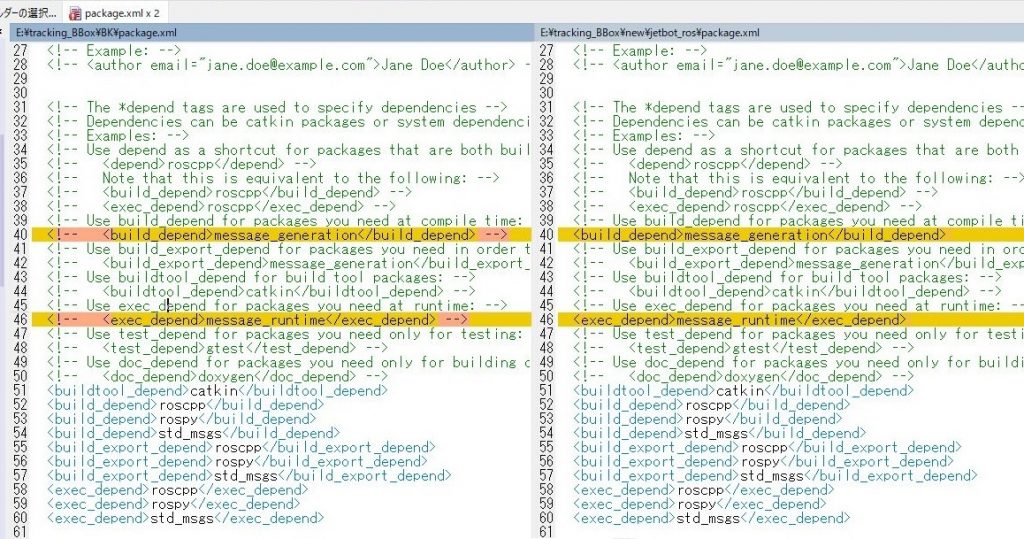
まずはパッケージファイル(package.xml)の以下の箇所のコメントアウトを外して保存します。編集後が右となります。
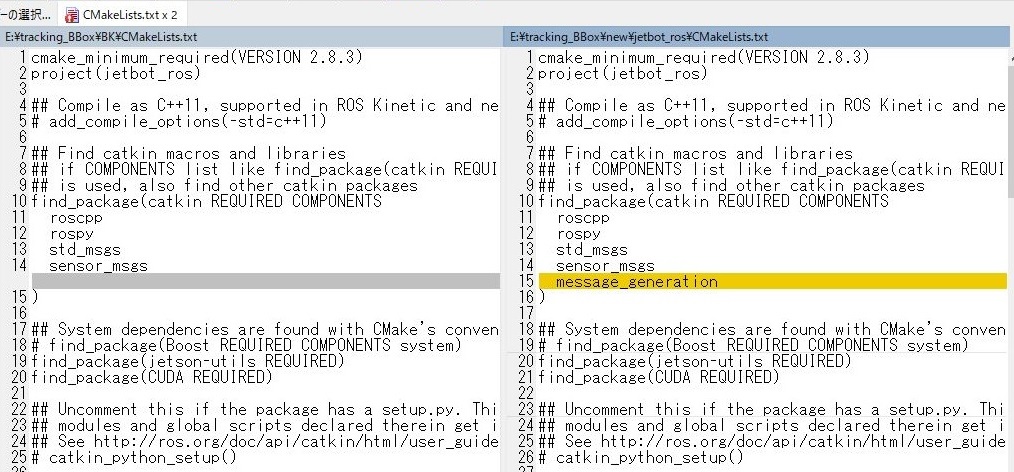
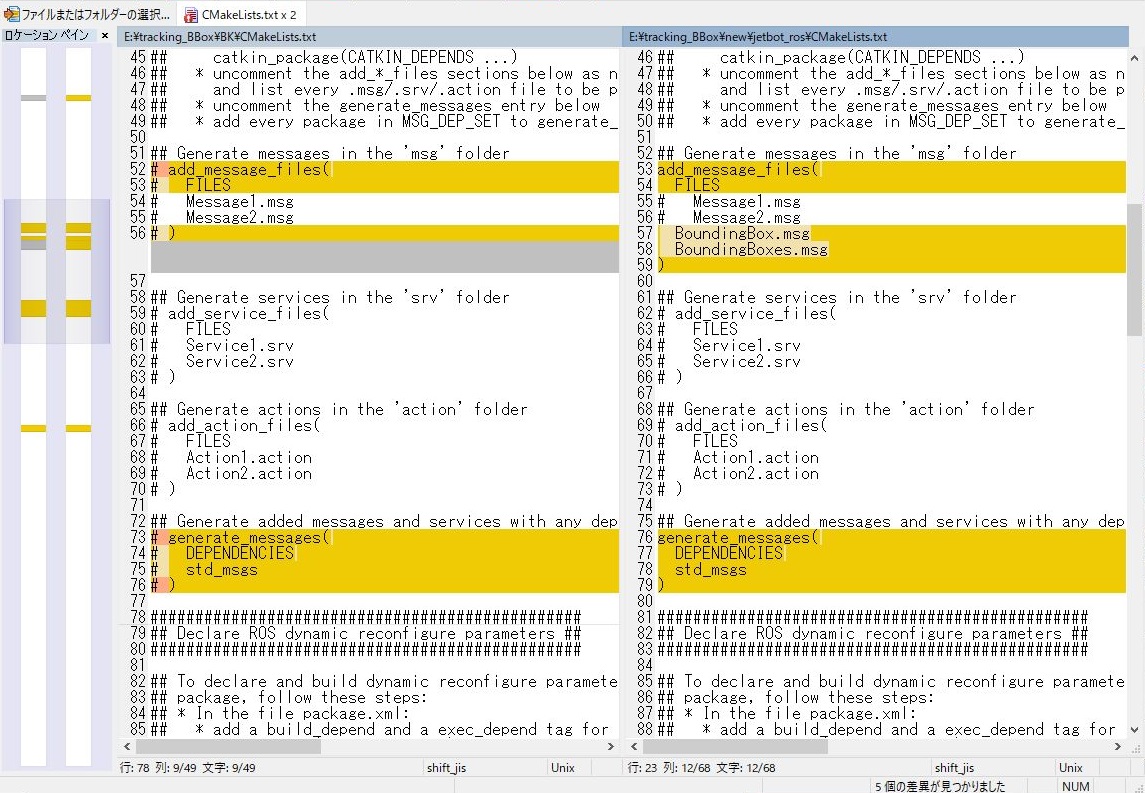
次にビルドファイル(CMakeLists.txt)のほうも編集して保存します。編集後が右となります。
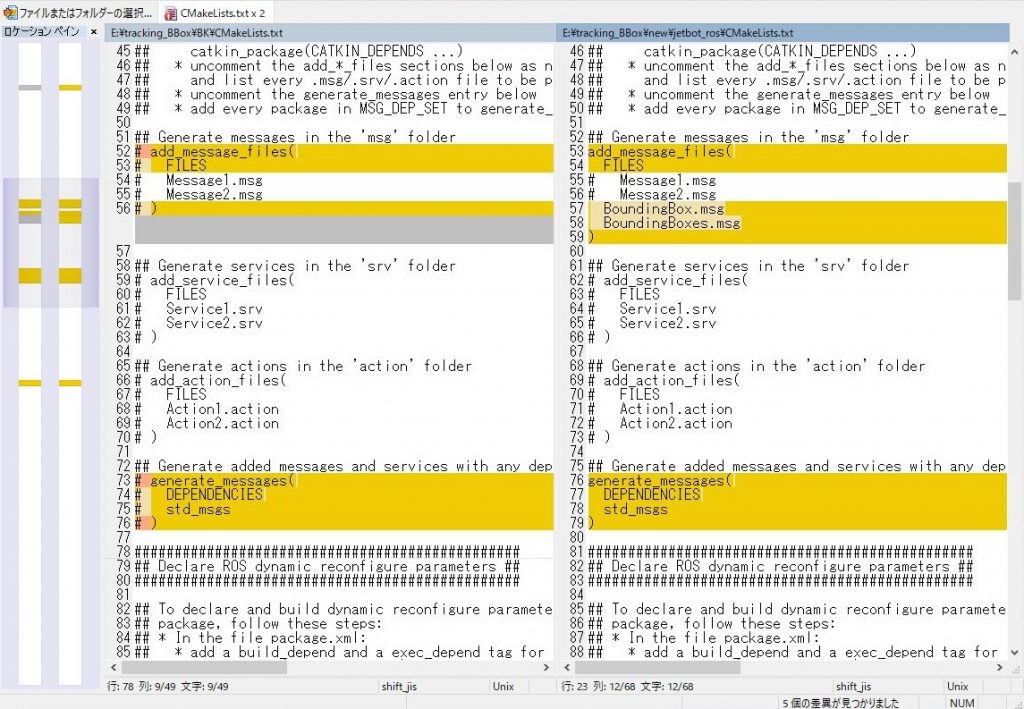
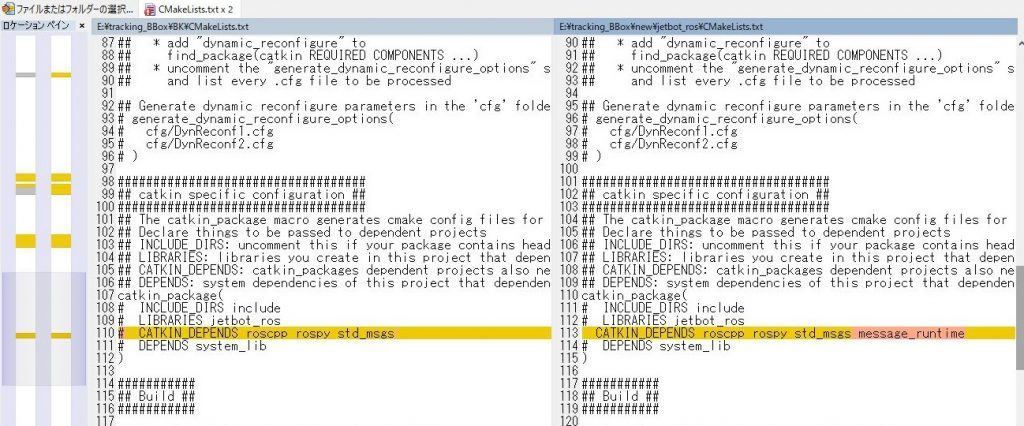
追加したメッセージファイルに合わせて以下は変更します。今回は「BoundingBox.msg」と「BoundingBoxes.msg」を追加しています。
上記までの準備が完了したらCatkinのワークフォルダまで戻ってから「catkin_make」でビルドを実行します。
ビルドが正常に完了したらメッセージファイルを利用できる状態になっています。試しに以下を実行してみます。
|
1 2 |
rosmsg show jetbot_ros/BoundingBox rosmsg show jetbot_ros/BoundingBoxes |
このように表示されれば正しくビルドできています。
|
1 2 3 4 5 6 7 8 9 10 11 12 13 14 15 16 17 18 |
jetbot@jetbot:~$ rosmsg show jetbot_ros/BoundingBox float64 probability int64 xmin int64 ymin int64 xmax int64 ymax int16 id string Class jetbot@jetbot:~$ rosmsg show jetbot_ros/BoundingBoxes jetbot_ros/BoundingBox[] bounding_boxes float64 probability int64 xmin int64 ymin int64 xmax int64 ymax int16 id string Class |
追加したメッセージファイルを利用する(例)
次に追加したメッセージファイルを利用する方法について記載していきます。メッセージファイルを送信する側のプログラムの例は以下のようになります。なお、以下はプログラムの一部を抜粋しただけの内容となっておりますので、そのままコピペしても動きません。BoundingBoxの送信部分だけ参考にしていただければと思います。
|
1 2 3 4 5 6 7 8 9 10 11 12 13 14 15 16 17 18 19 20 21 22 23 24 25 26 27 28 29 30 31 32 33 34 35 36 37 38 39 40 41 42 43 44 45 46 47 48 49 50 51 52 53 54 55 56 57 |
from jetbot_ros.msg import BoundingBoxes from jetbot_ros.msg import BoundingBox ################################################################ # # Draw all detection box Start # ################################################################ while True: Boxes = [] id_count = 0 # Loop over all detections and draw detection box if confidence is above minimum threshold for i in range(len(scores)): if ((scores[i] > min_conf_threshold) and (scores[i] <= 1.0)): # Get bounding box coordinates and draw box # Interpreter can return coordinates that are outside of image dimensions, need to force them to be within image using max() and min() ymin = int(max(1,(boxes[i][0] * imH))) xmin = int(max(1,(boxes[i][1] * imW))) ymax = int(min(imH,(boxes[i][2] * imH))) xmax = int(min(imW,(boxes[i][3] * imW))) cv2.rectangle(frame, (xmin,ymin), (xmax,ymax), (10, 255, 0), 2) # Draw label object_name = labels[int(classes[i])] # Look up object name from "labels" array using class index label = '%s: %d%%' % (object_name, int(scores[i]*100)) # Example: 'person: 72%' labelSize, baseLine = cv2.getTextSize(label, cv2.FONT_HERSHEY_SIMPLEX, 0.7, 2) # Get font size label_ymin = max(ymin, labelSize[1] + 10) # Make sure not to draw label too close to top of window cv2.rectangle(frame, (xmin, label_ymin-labelSize[1]-10), (xmin+labelSize[0], label_ymin+baseLine-10), (255, 255, 255), cv2.FILLED) # Draw white box to put label text in cv2.putText(frame, label, (xmin, label_ymin-7), cv2.FONT_HERSHEY_SIMPLEX, 0.7, (0, 0, 0), 2) # Draw label text boundingbox = BoundingBox(xmin = xmin,xmax = xmax,ymin = ymin,ymax = ymax,id = id_count,Class = object_name,probability = scores[i]) Boxes.append(boundingbox) id_count = id_count + 1 ################################################################ # # BoundingBox Publish Start # ################################################################ array_forPublish = BoundingBoxes(bounding_boxes=Boxes) motor.publish(array_forPublish) # All the results have been drawn on the frame, so it's time to display it. cv2.imshow('Object detector', frame) # Press 'q' to quit if cv2.waitKey(1) == ord('q'): break # Clean up cv2.destroyAllWindows() cap.release() |
物体検出したら「boundingbox = BoundingBox~」の部分でバウンディングボックスのインスタンスを作成し、「Boxes.append(boundingbox)」で配列に追加していきます。
すべてのバウンディングボックスを追加し終わったらループを抜け、「motor.publish(array_forPublish)」の部分でバウンディングボックスの配列をまとめてパブリッシュしています。
上記を実行してパブリッシュされていることを確認したい場合はこちらを実行します。
|
1 |
rostopic echo /jetbot_ros/bounding_box |
次にサブスクライブ側で受信したデータを利用するには例えば次のように行います。
|
1 2 3 4 5 6 7 8 9 10 11 12 13 14 15 16 17 18 19 20 21 22 23 24 25 26 27 28 29 30 31 32 33 34 35 36 37 38 39 |
################################################################ # # Get BoundingBoxes Data # ################################################################ def callback(data): box_xmin = 0 box_xmax = 0 box_ymin = 0 box_ymax = 0 width = 640 height = 480 probability = 0 for box in data.bounding_boxes: box_xmin = float(box.xmin / width) box_xmax = float(box.xmax / width) box_ymin = float(box.ymin / height) box_ymax = float(box.ymax / height) probability = box.probability rospy.loginfo( "Xmin: {}, Xmax: {} Ymin: {}, Ymax: {}".format( box_xmin, box_xmax, box_ymin, box_ymax ) ) ################################################################ # # Main start and Set Subscriber # ################################################################ if __name__ == '__main__': print ('main start') while not rospy.is_shutdown(): rospy.init_node('listener', anonymous=True) rospy.Subscriber('/jetbot_ros/bounding_box', BoundingBoxes , callback) rospy.spin() |




コメントを残す