今更ながらGoogle ColabというGPUが無料で使えるサービスがあることを知りました。YOLOでリアルタイム物体検出を行うには手元のPCのスペックが足りなすぎるので、こちらが使えるか試してみたいと思います。
自分のPCのGPUの種類については以下のサイトの方法で確認しました。
Windows10 グラフィックボードとディスプレイの確認方法
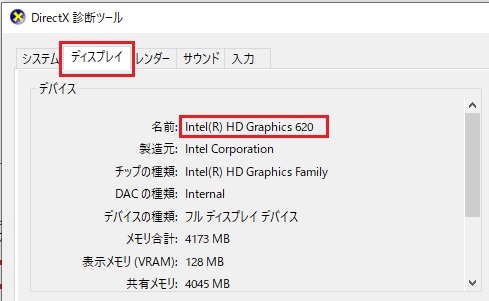
自分のノートPCのGPUを調べてみたらインテルのGPUでした。できればNVIDIAのGPUであってほしかったですね。まずは以下の記事の手順で動かそうとしてみましたが、こちらの方法では動かすことができませんでした。こちらはフレームワークの「Darknet」を使用して動かす方法です。
次にフレームワークの「Keras」を使用して動かす方法であれば自分のPCでも動かすことができましたが、学習を行うと非常に遅いのでやはりGoogle Colabを使ったほうがよさそうです。
ちなみにインテルとNVIDIAのGPUの違いについてはこちらの記事の説明が分かりやすいです。
ここからが本題です。今回は導入までしか行いません。
参考にしたのは下記のサイト
・Google Colaboratoryの無料GPU環境を使ってみた
・【秒速で無料GPUを使う】TensorFow(Keras)/PyTorch/Chainer環境構築 on Colaboratory
・ColaboratoryでChainer使ってYoloを動かす
導入までは上2つ、やってみたいこととしては3つ目の記事が参考になりそうです。分かりやすい記事が多くて有り難い。
とりあえず、1つ目の記事を参考にして導入までしてみました。
まずはColabのページにアクセスします。
https://colab.research.google.com
アクセスしたら「Python3の新しいノートブック」を選択します。

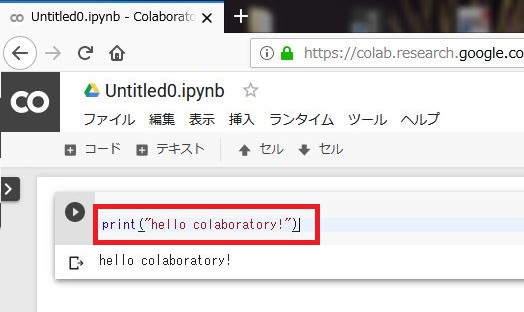
新しいノートブックができたら以下を入力して「Ctrl+Enter」で実行してみます。「hello colaboratory!」と表示できればOK。
|
1 |
print("hello colaboratory!") |
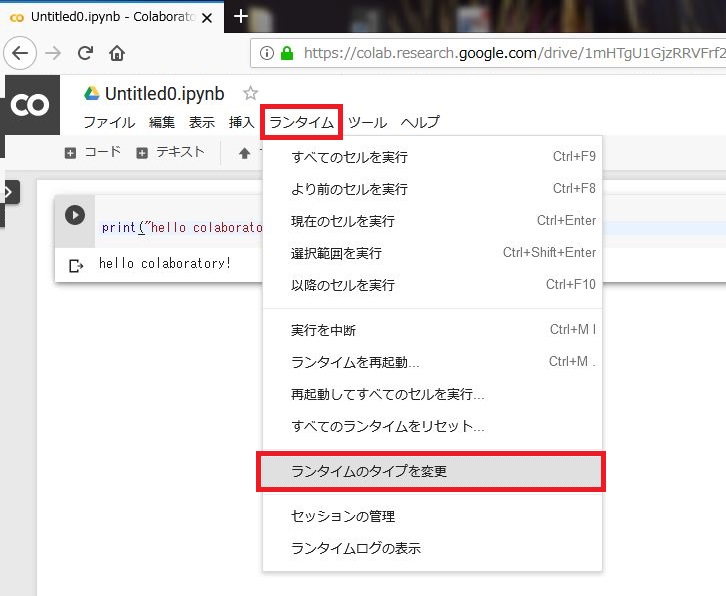
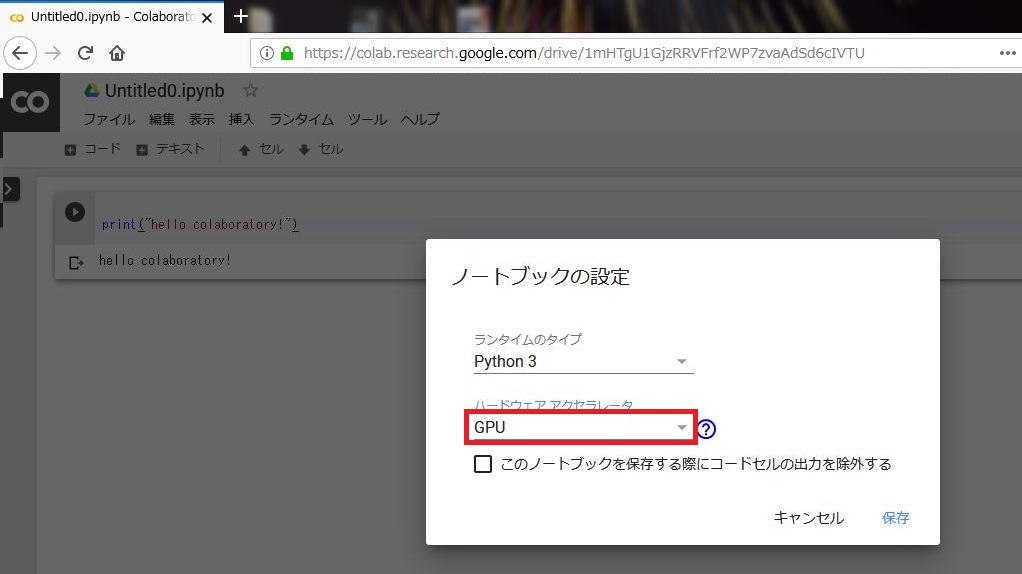
次に「ランタイム」→「ランタイムのタイプを変更」を選択して、「GPU」を選びます。これでColab内の「GPU」が有効になるようです。
Colabには既にたくさんのパッケージがインストールされています。以下を入力してインストールされているものを確認してみます。
|
1 |
!pip list |
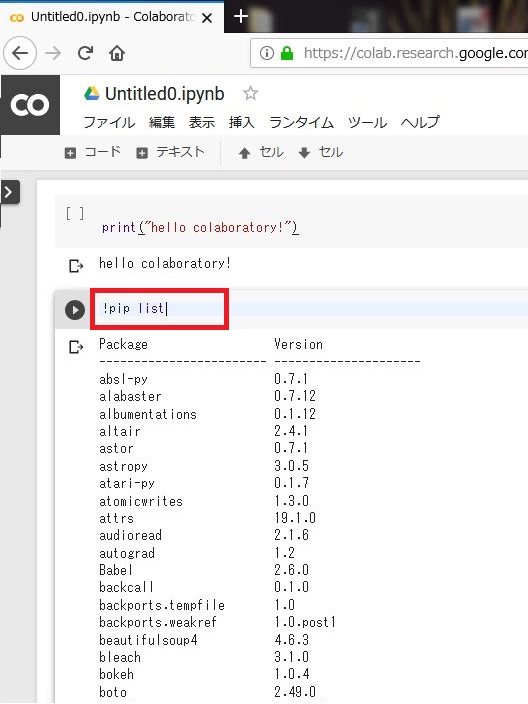
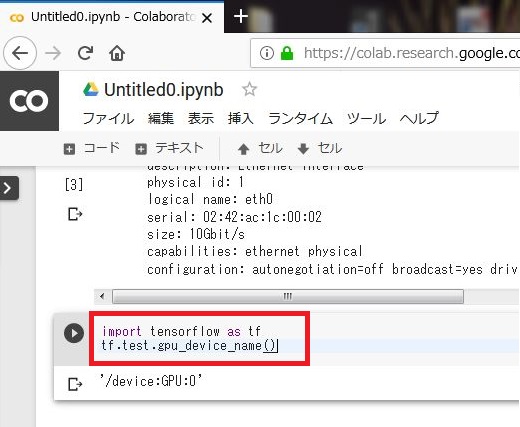
試しにTensorflowが使えるか以下のコードで試してみます。デバイス名が表示されればOK。
|
1 2 |
import tensorflow as tf tf.test.gpu_device_name() |
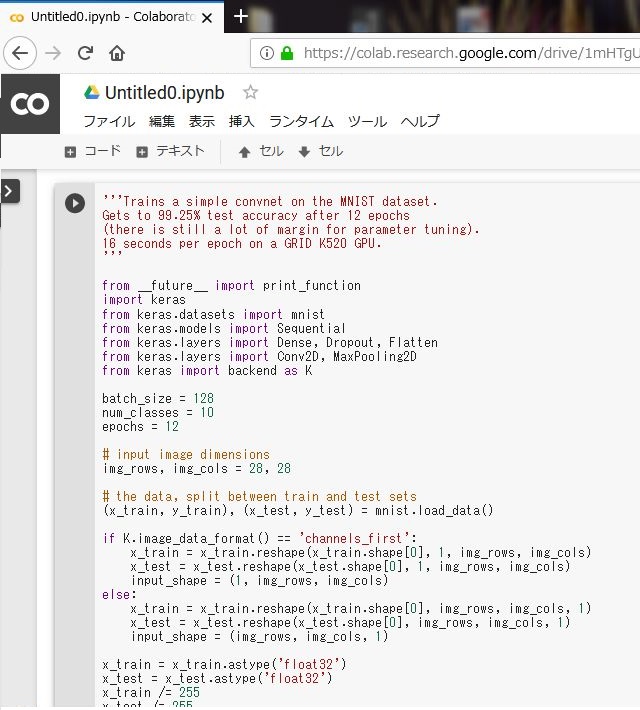
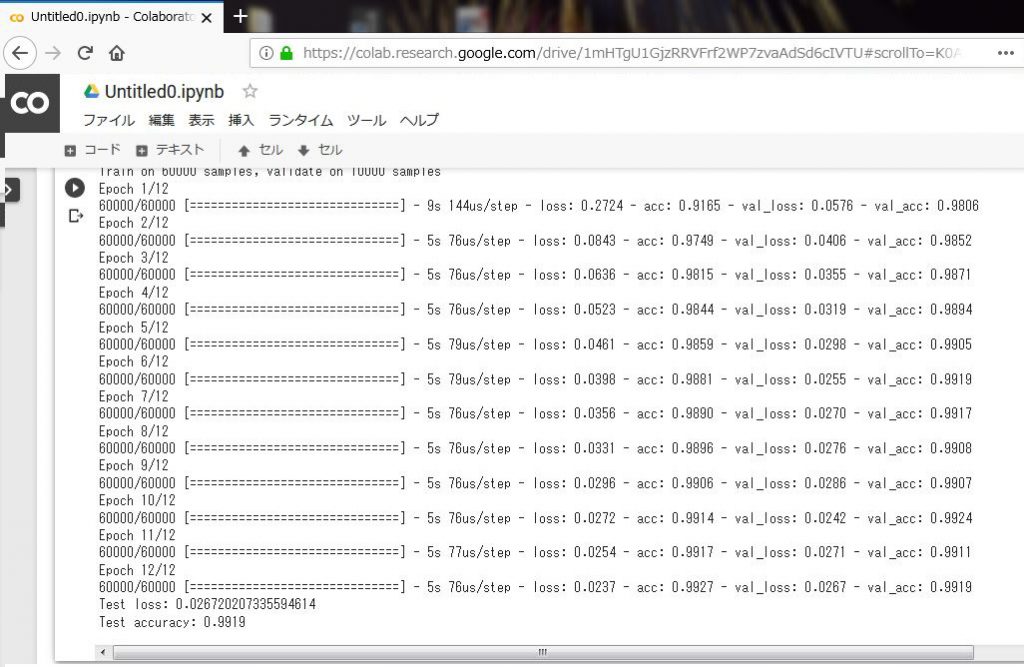
MNISTを実行してみます。
|
1 2 3 4 5 6 7 8 9 10 11 12 13 14 15 16 17 18 19 20 21 22 23 24 25 26 27 28 29 30 31 32 33 34 35 36 37 38 39 40 41 42 43 44 45 46 47 48 49 50 51 52 53 54 55 56 57 58 59 60 61 62 63 64 65 66 67 68 69 70 |
'''Trains a simple convnet on the MNIST dataset. Gets to 99.25% test accuracy after 12 epochs (there is still a lot of margin for parameter tuning). 16 seconds per epoch on a GRID K520 GPU. ''' from __future__ import print_function import keras from keras.datasets import mnist from keras.models import Sequential from keras.layers import Dense, Dropout, Flatten from keras.layers import Conv2D, MaxPooling2D from keras import backend as K batch_size = 128 num_classes = 10 epochs = 12 # input image dimensions img_rows, img_cols = 28, 28 # the data, split between train and test sets (x_train, y_train), (x_test, y_test) = mnist.load_data() if K.image_data_format() == 'channels_first': x_train = x_train.reshape(x_train.shape[0], 1, img_rows, img_cols) x_test = x_test.reshape(x_test.shape[0], 1, img_rows, img_cols) input_shape = (1, img_rows, img_cols) else: x_train = x_train.reshape(x_train.shape[0], img_rows, img_cols, 1) x_test = x_test.reshape(x_test.shape[0], img_rows, img_cols, 1) input_shape = (img_rows, img_cols, 1) x_train = x_train.astype('float32') x_test = x_test.astype('float32') x_train /= 255 x_test /= 255 print('x_train shape:', x_train.shape) print(x_train.shape[0], 'train samples') print(x_test.shape[0], 'test samples') # convert class vectors to binary class matrices y_train = keras.utils.to_categorical(y_train, num_classes) y_test = keras.utils.to_categorical(y_test, num_classes) model = Sequential() model.add(Conv2D(32, kernel_size=(3, 3), activation='relu', input_shape=input_shape)) model.add(Conv2D(64, (3, 3), activation='relu')) model.add(MaxPooling2D(pool_size=(2, 2))) model.add(Dropout(0.25)) model.add(Flatten()) model.add(Dense(128, activation='relu')) model.add(Dropout(0.5)) model.add(Dense(num_classes, activation='softmax')) model.compile(loss=keras.losses.categorical_crossentropy, optimizer=keras.optimizers.Adadelta(), metrics=['accuracy']) model.fit(x_train, y_train, batch_size=batch_size, epochs=epochs, verbose=1, validation_data=(x_test, y_test)) score = model.evaluate(x_test, y_test, verbose=0) print('Test loss:', score[0]) print('Test accuracy:', score[1]) |
以下のコードを入力してGPUの種類を確認してみます。
|
1 |
!nvidia-smi |
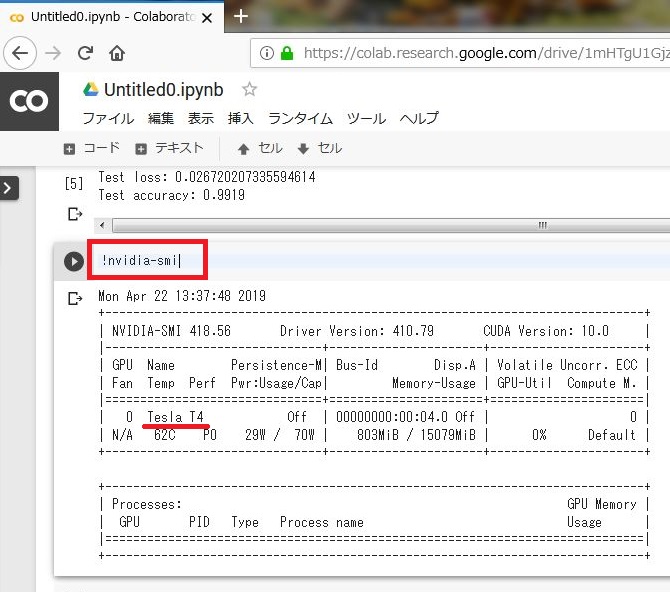
現時点ではTesla T4が使われているようです。Teslaシリーズはデータサーバーなどの業務用として使用されていて、他には個人向けのGeForceシリーズなどがあるようです。GeForceとTeslaの違いについてはこちらの記事が分かりやすいです。
では、このTesla T4の性能はGeForceと比較するとどうなのか気になると思います。単純比較はできないようですが以下のサイトで点数比較してみると「Tesla T4」と「Palit GeForce GTX 1060 Dual」が大体同じような点数となるようです。
Nvidia Tesla T4 vs Palit GeForce GTX 1060 Dual
上記で「Tesla T4」は「GeForce GTX 1060」と同じぐらいということが分かりましたので、こちらのサイトで「GeForce GTX 1060」がどこに該当するか見てみます。
GeForce GTX1060のあたりをベンチマーク順に並べてみるとこのようになります。
GeForce GTX1050 < GeForce GTX1650 < GeForce GTX1060(≒Tesla T4) < GeForce GTX1070
DELLの最新のノートPC(XPS15)にはGeForce GTX1650が搭載されていますので、これと同等以上のGPUを無料で使用できるということになります。すばらしい。
私の認識に間違いなどがありましたらコメントください。
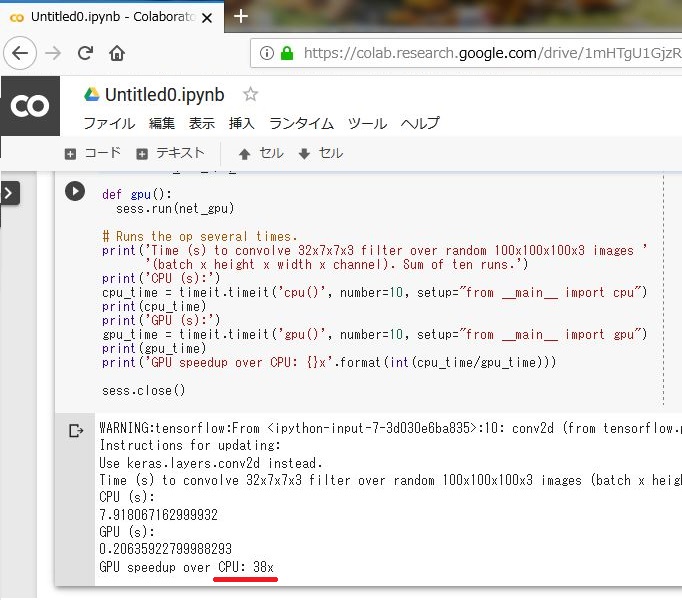
次に参考記事にあったCPUとGPUの性能を比較するコードを入力して実行してみます。参考サイトでは「9倍」とありましたが、実際に行ってみるとなんと「38倍」の差がありました。GPUのほうが圧倒的に早いようです。
今後YOLOを使うときはCorabを使ったほうが良さそうだということが分かりました。
|
1 2 3 4 5 6 7 8 9 10 11 12 13 14 15 16 17 18 19 20 21 22 23 24 25 26 27 28 29 30 31 32 33 34 35 36 37 38 39 40 41 42 43 44 45 46 47 |
import tensorflow as tf import timeit # See https://www.tensorflow.org/tutorials/using_gpu#allowing_gpu_memory_growth config = tf.ConfigProto() config.gpu_options.allow_growth = True with tf.device('/cpu:0'): random_image_cpu = tf.random_normal((100, 100, 100, 3)) net_cpu = tf.layers.conv2d(random_image_cpu, 32, 7) net_cpu = tf.reduce_sum(net_cpu) with tf.device('/gpu:0'): random_image_gpu = tf.random_normal((100, 100, 100, 3)) net_gpu = tf.layers.conv2d(random_image_gpu, 32, 7) net_gpu = tf.reduce_sum(net_gpu) sess = tf.Session(config=config) # Test execution once to detect errors early. try: sess.run(tf.global_variables_initializer()) except tf.errors.InvalidArgumentError: print( '\n\nThis error most likely means that this notebook is not ' 'configured to use a GPU. Change this in Notebook Settings via the ' 'command palette (cmd/ctrl-shift-P) or the Edit menu.\n\n') raise def cpu(): sess.run(net_cpu) def gpu(): sess.run(net_gpu) # Runs the op several times. print('Time (s) to convolve 32x7x7x3 filter over random 100x100x100x3 images ' '(batch x height x width x channel). Sum of ten runs.') print('CPU (s):') cpu_time = timeit.timeit('cpu()', number=10, setup="from __main__ import cpu") print(cpu_time) print('GPU (s):') gpu_time = timeit.timeit('gpu()', number=10, setup="from __main__ import gpu") print(gpu_time) print('GPU speedup over CPU: {}x'.format(int(cpu_time/gpu_time))) sess.close() |
続きはこちらの記事に記載しています。







コメントを残す